Please select your product category below.
This repair guide intends to help you identify and solve the minor problems caused by unusual operation of the electric system of our sit-stand desk. If the following guides can’t help solve the problems, please contact your point of purchase for further support or replace the accessories.
1. For Control Panel CT-05/CT-06(only for High-Speed Standing Desks)
* E01: Overload protection has occurred. Please remove the items from the desktop.
* E02/HOT:Over-heating in the controller has occurred. Stop operating and allow your desk to cool down and remain idle for 9 minutes.
* E03:Desk moves in wrong direction. Check the connection or replace the motor cords.
* E04: The columns don't go together. Please unplug and reinsert the cables between the columns and control box, then hold together and long press the " Up " and " Down " buttons to reset the system.
* E05:Cords may be broken. Check the connection or replace the motor cords.
* E06:Collision avoidance system has been activated. Remove all the objects within the range of travel.
* E08: The control panel is disconnected. Please check the connection. Unplug and reinsert the cables between the control panel and control box.
* E10: There are 3 possibilities - a). The control box is out of position. Please make sure the control box is properly attached to the desk frame as the instruction manual or placed well on the even surface. b). The power cords have pulled the control box. Manage the cables and keep them from pulling the control box. c). Collision avoidance system has activated. Remove all the objects within the range of motion.
* E12/E13: Electrical problem has occurred. Plug off the power and re-plug.
* E14: Short circuit. Replace the control box.
* E15: Reset failure. Check and replace the columns.
* E18: Electrical problem has occurred. Plug off the power and re-plug. If it doesn’t work, replace the control box.
* E19: The reset process is interrupted. Please strictly follow the instruction to reset the system. Keeping pressing and hold the " Up " and " Down " buttons until the process is done.
* E22: Collison avoidance system failure. Replace the control box.
2. For Control Panel CT-07/CT-08/CT-09J
* E01/E07: Electrical problem has occurred. Plug off the power and re-plug.
* HOT: Over-heating in the controller has occurred. Stop operating and allow your desk to cool down and remain idle for 18 minutes.
* E02: The columns don’t go together. Reset the system.
* E04: The control panel is disconnected. Please check the connection. Unplug and reinsert the cable between the control panel and control box.
* E05: Collision avoidance system has been activated. Remove all the objects within the range of travel.
* E06: Electrical problem has occurred. Plug off the power and re-plug. If it doesn’t work, replace the control box.
* E08: If E08 and RST error code displays, there are 3 possibilities - a). The control box is out of position. Please make sure the control box is properly attached to the desk frame as the instruction manual or placed well on the even surface. b). The power cords have pulled the control box. Manage the cables and keep them from pulling the control box. c). Collision avoidance system has activated. Remove all the objects within the range of motion. To reset the system, please hold together and long press the " Up " and " Down " buttons.
* E11/E21/E31: The motor cords were disconnected. Please check the connection. Unplug and reinsert the cable between the columns and control box.
* E12/E22/E32: Electrical problem has occurred. Plug off the power and re-plug. If it doesn’t work, replace the control box.
* E13/E23/E33: Motor wires may be broken. Check the connection or replace the motor cords. E13 corresponds to M1 connector, E23 corresponds to M2, and E33 corresponds to M3.
* E14/E24/E34: Hall wires may be broken. Check the connection or replace the motor cords. E14 corresponds to M1 connector, E24 corresponds to M2, and E34 corresponds to M3.
* E15/E25/E35: Short circuit. Replace the motors or columns. E15 corresponds to M1 connector, E25 corresponds to M2, and E35 corresponds to M3.
* E16/E26/E36: Overload leads to the motor failing to drive. Remove the items from the desktop then reset the system.
* E17/E27/E37: Desk moves in wrong direction. Check the connection or replace the motor cords. E17 corresponds to M1 connector, E27 corresponds to M2, and E37 corresponds to M3.
* E18/E28/E38: Overload has occurred. Please remove the items from the desktop.
* E42: Memory cannot be read. Plug off the power and re-plug. If it doesn’t work, replace the control box.
* E43: Collision avoidance system failure. Replace the control box.
3. For Control Panel T150/C150
* ER1: Overload protection has occurred. Please remove the items from the desktop, unplug and re-plug the power after 10 seconds.
* ER2/HOT: Over-heating in the controller has occurred. Stop operating and allow your desk to cool down and remain idle for 18 minutes.
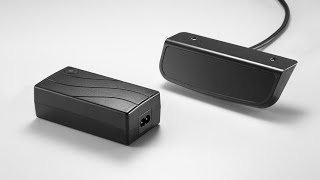
* ER3: The motor cords were disconnected. Please check the connection. Unplug and reinsert the cable between the columns and AC adapter . Then reset the system.
* ER5: There are 2 possibilities - a). Voltage overload has occurred. Please replace the AC Adapter. b). Overload protection has occurred. Please remove the items from the desktop, unplug and re-plug the power after 10 seconds.
4. For Control Panel CT-10
* HOT: Over-heating in the controller has occurred. Stop operating and allow your desk to cool down and remain idle for 18 minutes.
* E01: Overvoltage has occurred. Please unplug and reinsert the power cable. If the problem still exists, please replace the control box.
* E02: Column problem has occurred. Please reset the system.
* E04: The control panel is disconnected. Please check the connection. Unplug and reinsert the cable between the control panel and control box.
* - - -: Collision avoidance system has activated. Please remove all the objects within the range of motion.
* E06/E07: The voltage was too low. Please unplug and reinsert the power cable. If the problem still exists, please replace the control box.
* E08: There are 3 possibilities - a). The control box is out of position. Please make sure the control box is properly attached to the desk frame as the instruction manual or placed well on the even surface. Then reset the system. b). The power cords have pulled the control box. Manage the cables and keep them from pulling the control box. Then reset the system. c).Collision avoidance system has activated. Remove all the objects within the range of motion. Then reset the system.
* E11/21: The motor cords were disconnected. Please check the connection. Unplug and reinsert the cable between the motor cords and control box. If the problem still exists, replace the motor cords or columns.
* E12/E22: Electrical problem has occurred. Please unplug and reinsert the power cable. If the problem still exists, please replace the control box.
* E13/E23: The motor cables were broken. Please replace the motor cords or columns.
* E14/E24: The motor cables were broken. Please check the connection. Unplug and re-insert the motor cords into the control box. If the problem still exists, replace the motor cords or columns.
* E15/E25: Short circuit has occurred. Please replace the motors or columns.
* E16/E26: Overload protection has occurred. Please remove the items from the desktop. Then reset the system.
* E17/E27: Desk moves in wrong direction. Please replace the motor cords or columns.
* E18/E28: Overload protection has occurred. Please remove the items from the desktop.
* E41/42/43: The control box was broken. Please replace the control box.
5. For Control Panel CT-11
* HOT: Over-heating in the controller has occurred. Stop operating and allow your desk to cool down and remain idle for 18 minutes.
* E01: Overvoltage has occurred. Please unplug reinsert the power cable. If the problem still exists, please replace the control box.
* E04: The control panel is disconnected. Please check the connection. Unplug and reinsert the cable between the control panel and control box.
* - - -: Collision avoidance system has activated. Remove all the objects within the range of motion.
* E06/E07: The voltage was too low. Please unplug and reinsert the power cable. If the problem still exists, please replace the control box.
* E11: The motor cords were disconnected. Please check the connection. Unplug and reinsert the cable between the motor cords and control box. If the problem still exists, replace the motor cords or columns.
* E12: Electrical problem has occurred. Please unplug and reinsert the power cable. If the problem still exists, please replace the control box.
* E13: The motor cables were broken. Please replace the motor cords or columns.
* E14: The motor cables were broken. Please check the connection. Unplug and re-insert the motor cords into the control box. If the problem still exists, replace the motor cords or columns.
* E15: Short circuit has occurred. Please replace the motors or columns.
* E16: Overload protection has occurred. Please remove the items from the desktop. Then reset the system.
* E17: Desk moves in wrong direction. Please replace the motor cords or columns.
* E18: Overload protection has occurred. Please remove the items from the desktop.
* E41/42/43: The control box was broken. Please replace the control box.

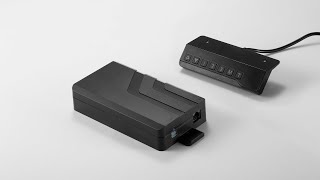
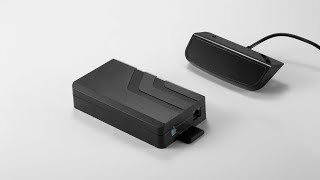
Push-Button Control Panel - CT-05 & Control Box

Touch-screen Control Panel - CT-06 & Control Box

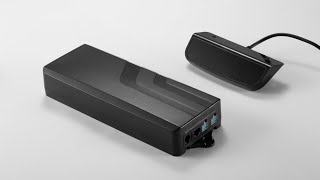
Push-Button Control Panel - CT-07 & Compact Control Box

Touch-screen Control Panel - CT-08 & Compact Control Box

Touch-screen Control Panel - CT-09J & Compact Control Box

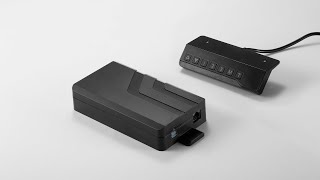
Push-Button Control Panel - T150 & Control Box

Touch-Screen Control Panel - C150 & Control Box
There are 4 custom options:
1. Minimal & maximum height limit.
2. Anti-collision sensitivity
3. Current height display
4. Child lock function
1. Minimal & maximum height limit.
a). For Control Panel CT-05/CT-06
Minimal height limit: Long press " M " and " T " buttons simultaneously for about 5 seconds until the unit emits one beep and the display flashes the Current Minimal Height Limit ("62.0" by default), then press " Up " or " Down " button to adjust the Min. Height Limit. The adjustable range is from 62 - 118 cm (24.4 - 46.4 inches) . Press " 1 " to save, and press " T " to finish the adjustment.
Maximum height limit: Long press " M " and " T " buttons simultaneously for about 5 seconds until the unit emits one beep and the display flashes the Current Minimal Height. Press " M " button and the Current Maximum Height Limit ("128" by default) is displayed. Press " Up " or " Down " button to set the Max. Height Limit. The adjustable range is from 72 - 128 cm (28.3 - 50.4 inches) . (Please Note: The display won't count the number immediately when you are in metric system. Keep pressing until the display count to your desired height limit.) Press " 1 " to save, and press " T " to finish the adjustment.
b). For Control Panel CT-07/CT-08/CT-09J
Minimal height limit: Long press " M " and " T " buttons simultaneously for about 5 seconds until the unit emits one beep and the display flashes " S-1 ". Press " M " button once and the Current Minimal Height Limit is displayed ("62.0" by default), then press "Up" or "Down" button to set your desired height, and press "M" again to save.
Maximum height limit: Long press " M " and " T " buttons simultaneously for about 5 seconds until the unit emits one beep and the display flashes " S-1 ". Press " Up " or " Down " button to switch from" S-1 " to " S-7 ". When the display is flashing " S-2 ", press " M " button once and the Current Maximum Height Limit is displayed. Press " Up " or " Down " button to set your desired height, and press " M " again to save.
c). For Control Panel CT-10
Set the Minimal & Maximum height limit: Move the desk to your desired height. Long press " + " and " - " buttons simultaneously for approximately 5 seconds until the unit emits a beep. Then the setting is finished.
d). For Control Panel CT-11
Set the Minimal & Maximum height limit: Move the desk to your desired height. Long press " "or " " buttons simultaneously for approximately 5 seconds until the unit emits a beep. Then the setting is finished.
2. Collision Avoidance Settings
(GYRO senses abnormal motion / CURRENT senses impact with objects)
a). For Control Panel CT-05/CT-06
CURRENT Sensor - Adjusting the UPWARD/DOWNWARD Anti-Collision Sensitivity
Long press " M " and " T " buttons simultaneously for about 5 seconds until the unit emits one beep. Press " M " button until " CC- " begins flashing.Press " Up " or " Down " button to adjust the sensitivity. The higher the number, the higher the sensitivity of the unit. Press " 1 " to save, press " T " to finish the adjustment.
GYRO Sensor - Adjusts the overall sensitivity of the GYRO for all movement (UP&DOWN)
Long press " M " and " T " buttons simultaneously for about 5 seconds until the unit emits one beep. Press " M " button until " SC- " begins flashing. Press " Up " or " Down " button to adjust the sensitivity. The higher the number, the higher the sensitivity of the unit. Press " 1 " to save, press " T " to finish the adjustment.
b). For Control Panel CT-07/CT-08/CT-09J
S-3/S-4 CURRENT Sensor
S-3 Adjusting the UPWARD Anti-Collision Sensitivity
LONG PRESS " M " and " T " buttons simultaneously for about 5 seconds until the unit emits one beep.Press " Up " until “S-3” begins flashing. Press " M " button, then press " Up " or " Down " button to adjust the sensitivity from level 1 to level 8.The higher the number, the higher the sensitivity of the unit.press " M " button to save.
S-4 Adjusting the DOWNWARD Anti-Collision Sensitivity
LONG PRESS " M " and " T " buttons simultaneously for about 5 seconds until the unit emits one beep.Press " Up " until “S-4” begins flashing. Press " M " button, then press " Up " or " Down " button to adjust the sensitivity from level 1 to level 8.The higher the number, the higher the sensitivity of the unit.press " M " button to save.
S-5 GYRO Sensor
S-5 Adjusts the overall sensitivity of the GYRO for all movement (UP&DOWN)
LONG PRESS " M " and " T " buttons simultaneously for about 5 seconds until the unit emits one beep.Press " Up " until “S-5” begins flashing. Press " M " button, then press " Up " or " Down " button to adjust the sensitivity from level 1 to level 8.The higher the number, the higher the sensitivity of the unit.press " M " button to save.
c). For Control Panel CT-10
S-3/S-4 CURRENT Sensor
Adjusting the UPWARD Anti-Collision Sensitivity
Long press "
 ", then press "
+
" or "
-
" button to switch to " S-3". Press "
" button, then press "
+
" or "
-
" button to adjust the sensitivity from level 1 to level 8. The higher the number, the higher the sensitivity of the unit.
", then press "
+
" or "
-
" button to switch to " S-3". Press "
" button, then press "
+
" or "
-
" button to adjust the sensitivity from level 1 to level 8. The higher the number, the higher the sensitivity of the unit.
S-4 Adjusting the UPWARD Anti-Collision Sensitivity
Long press "
", then press "
+
" or "
-
" button to switch to " S-4". Press "
" button, then press "
+
" or "
-
" button to adjust the sensitivity from level 1 to level 8. The higher the number, the higher the sensitivity of the unit.
S-2 GYRO Sensor
Long press "
", then press "
+
" or "
-
" button to switch to " S-2". Press "
" button, then press "
+
" or "
-
" button to adjust the sensitivity from level 1 to level 8. The higher the number, the higher the sensitivity of the unit.
d). For Control Panel CT-11
S-3/S-4 CURRENT Sensor
S-3 Adjusting the UPWARD Anti-Collision Sensitivity
Long press " S ", then press " " or" " button to switch to " S-3". Press " S " button, then press " "or " " button to adjust the sensitivity from level 1 to level 8. The higher the number, the higher the sensitivity of the unit.
S-4 Adjusting the UPWARD Anti-Collision Sensitivity
Long press " S ", then press " " or" " button to switch to " S-4". Press " S " button, then press " "or " " button to adjust the sensitivity from level 1 to level 8. The higher the number, the higher the sensitivity of the unit.
3. Changing the Display Height
(for adding the desktop thickness to the height setting)
a). For Control Panel CT-05/CT-06
LONG PRESS " M " and " T " buttons simultaneously for about 5 seconds until the unit emits one beep.Press " M " until the Current Desktop Thickness is displayed.Then press " Up " or " Down " button to set the current display height. The adjustable range is from 0 - 5 cm (0 - 1.9 inches). After setting, press " 1 " to save, and press " T " to finish the adjustment.
b). For Control Panel CT-07/CT-08/CT-09J
LONG PRESS " M " and " T " buttons simultaneously for about 5 seconds until the unit emits one beep. Press " Up " until " S-6 " begins flashing. Press " M " button, then press Up or " Down " to set the current display height.Press " M " button to save.
c). For Control Panel CT-10
Reset the system and measure the actual height (includes desktop) of the desk. LONG PRESS "
", then press "
+
" or "
-
" button to switch to "S-5". Press "
" button, then press
+
" or "
-
" button to set the current display height.
d). For Control Panel CT-11
Reset the system and measure the actual height (includes desktop) of the desk. LONG PRESS " S ", then press " " or " " button to switch to "S-5". Press " S " button, then press "or " " button to set the current display height.
4. Child lock function
a). For Control Panel CT-05/CT-06
Long press " M " and " T " buttons simultaneously for about 5 seconds until the unit emits one beep and the display flashes the Current Minimal Height Limit. Press " M " for five times and the Current Screen Lock Setting is displayed (" A-0 " indicates function OFF; " A-1 " indicates function ON ). Press " Up " or " Down " to set your desired locking function. After setting, press " 1 " to save, and press " T " to finish the adjustment.
b). For Control Panel CT-07/CT-08/CT-09J
Long press " M " and " T " buttons simultaneously for about 5 seconds until the unit emits one beep and the display flashes " S-1 ". Press " Up " or " Down " button to switch from " S-1 " to " S-7 ". When display is flashing " S-7 ", press " M " button once and the Current Screen Lock Setting is displayed. (" 1 " indicates function ON; " 0 " indicates OFF ). Press " UP " or " Down " button to set your desired locking function, and press " M " button again to save.

Push-Button Control Panel - CT-05 & Control Box

Touch-screen Control Panel - CT-06 & Control Box
Push-Button Control Panel - CT-07 & Compact Control Box
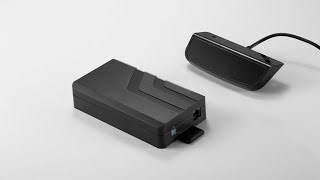
Touch-screen Control Panel - CT-08 & Compact Control Box
Touch-screen Control Panel - CT-09J & Compact Control Box
For safety reasons the control panel has a locking function. To activate / cancel the locking function, follow the second part - "How to customized settings - 4. Child lock function".
a). For Control Panel CT-05/CT-06
To lock the control, press" M " button for 3 seconds. If the control is locked ,only a bar "---" is lighting in the display and any operation is invalid.
To unlock the control, press " M " button for 3 seconds, until the current height is shown in the display. The control will be active for 1 minute. If no activations made within 1 minute, the control will turn into locking mode again with the locking function is ON.
To activate the control panel in Power-Saving Mode, just press any button. (The system will be in Power-Saving Mode with display being dark when there are no activations made within 10 minutes.)
b). For Control Panel CT-07/CT-08/CT-09J
To lock the control, press " M " button for 3 seconds. If the control is locked, only a bar "---" is lighting in the display and any operation is invalid.
To unlock the control, press " M " button for 3 seconds, until the current height is shown in the display. The control will be active for 1 minute. If no activations made within 1 minute, the control will turn into locking mode again with the locking function is ON.
To activate the control panel in Power-Saving Mode, just press any button. (The system will be in Power-Saving Mode with display being dark when there are no activations made within 10 minutes.)
c). For Control Panel C150
To lock the screen, long press " M " button until the "---" is displayed.
To unlock the screen, long press " M " button until the current height is displayed.
To activate the control panel in Power-Saving Mode, just press any button. (The system will be in Power-Saving Mode with display being dark when there are no activations made within 1 minutes.)
d). For Control Panel CT-10
To lock the screen, long press "
" and "
+
" buttonssimultaneously until the "
Loc
" is displayed.
To unlock the screen, long press together "
" and "
-
" buttons simultaneously until the current height is displayed.
e). For Control Panel CT-11
To lock the screen, long press together " S " and " " buttons simultaneously until the " Loc " is displayed.
To unlock the screen, hold and press together " S " and " " buttons until the current height is displayed.
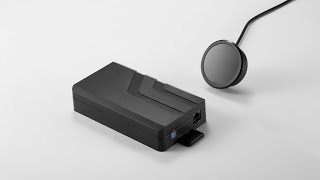
Push-Button Control Panel - CT-05 & Control Box

Touch-screen Control Panel - CT-06 & Control Box

Push-Button Control Panel - CT-07 & Compact Control Box
Touch-screen Control Panel - CT-08 & Compact Control Box

Touch-screen Control Panel - CT-09J & Compact Control Box

Touch-Screen Control Panel - C150 & Control Box
a). For Control Panel CT-05/CT-06
Long press "
Up
" and "
Down
" buttons simultaneously. The unit emits one beep and the display shows "
 " and the desk start moving downward and to the lowest position. Keep pressing until the display shows the current desk height. Then the reset process is finished.
b). For Control Panel CT-07/CT-08/CT-09J
There are 2 reset options:
1. Factory Reset
2. Reset of the Custom Programming
1. Factory Reset:
Long press "
Up
" and "Down" buttons simultaneously. The unit emits one beep and the display shows "
" and the desk start moving downward and to the lowest position. Keep pressing until the display shows the current desk height. Then the reset process is finished.
2. Reset of the Custom Programming:
Long press " M ", " T ", and " Up " buttons simultaneously. The unit beeps to indicate the reset is completed.
c). For Control Panel C150/T150
Unplug and re-plug the power to your desk whenever you want to reset the system. Long press "
" buttons until the display shows "
".The desk start moving downward and to the lowest position. Keep pressing until the display shows the current desk height. Then the reset process is finished.
d). For Control Panel CT-10
Here are 2 reset options:
1. Factory Reset
2. Reset of the Custom Programming
1. Factory Reset:
Long press the " - " button until the desk start moving downward and to the lowest position, then release the button. Long press the " - " button again for approximately 5 seconds, the display will show " 000 " and the desk start moving further downward and the current desk height is displayed. Then reset process is finished.
2. Reset of the Custom Programming:
Long press " + " and " - " buttons simultaneously. The unit beeps and the " 000 " is displayed, then release two buttons. Long press " - " buttons until the desk start moving downward and to the lowest position and the current desk height is displayed. The reset process is finished, all custom settings have been erased.
e). For Control Panel CT-11
Here are 2 reset options:
1. Factory Reset
2. Reset of the Custom Programming
1. Factory Reset:
Long press the " " button until the desk start moving downward and to the lowest position, then release the button. Long press the " " button again for approximately 5 second, the display will show " 000 " and the desk start moving further downward and the current desk height is displayed. Then reset process is finished.
2. Reset of the Custom Programming:
Long press " "or " " buttons simultaneously. The unit beeps and the " 000 " is displayed, then release two buttons. Long press " " buttons until the desk start moving downward and to the lowest position and the current desk height is displayed. The reset process is finished, all custom settings have been erased.

Push-Button Control Panel - CT-05 & Control Box
Touch-screen Control Panel - CT-06 & Control Box
Push-Button Control Panel - CT-07 & Compact Control Box

Touch-screen Control Panel - CT-08 & Compact Control Box

Touch-screen Control Panel - CT-09J & Compact Control Box

Push-Button Control Panel - T150 & Control Box

Touch-Screen Control Panel - C150 & Control Box
a). For Control Panel CT-05/CT-06/CT-07/CT-08/C150/T150
To save a memory position, press
M
” button and the display will flash “
 ”. While the “
S
-” is displayed, press the button "
1
", "
2
" "
3
".
”. While the “
S
-” is displayed, press the button "
1
", "
2
" "
3
".
To call a stored position, press memory button " 1 ", " 2 " " 3 ". and the system will start moving to the desired memory position. The display will count the height as it is driving to the memory position. Press any button to stop the motion.
b). For Control Panel CT-09J
To save a memory position, press “
M
” button and the display will flash “
”. While the “
S
-” is displayed, press the button "
1
" or "
2
".
To call a stored position, press memory button " 1 "or " 2 ". and the system will start moving to the desired memory position. The display will count the height as it is driving to the memory position. Press any button to stop the motion.
c). For Control Panel CT-10
To save a memory position, press the “
” button and the display will flash “
”. While the "
S-
" is displayed, press the button "
I
" or "
II
".
To call a stored position, press memory button " I " or " II ", and the system will start moving to the desired memory position. The display will count the height as it is driving to the memory position. Press any button to stop the motion.
d). For Control Panel CT-11
To save a memory position, press the "
S
" button and the display will flash “
”. While the "
S-
" is displayed, press the button "
1
", "
2
", "
3
".
To call a stored position, press memory button " 1 ", " 2 ", " 3 ", and the system will start moving to the desired memory position. The display will count the height as it is driving to the memory position. Press any button to stop the motion.

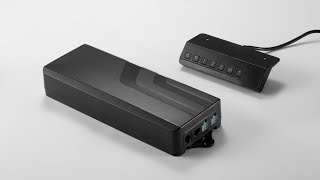
Push-Button Control Panel - CT-05 & Control Box

Touch-screen Control Panel - CT-06 & Control Box

Push-Button Control Panel - CT-07 & Compact Control Box

Touch-screen Control Panel - CT-08 & Compact Control Box

Touch-screen Control Panel - CT-09J & Compact Control Box
Push-Button Control Panel - T150 & Control Box
Touch-Screen Control Panel - C150 & Control Box
a). For Control Panel CT-05/CT-06/CT-07/CT-08/CT-09J/C150/T150
Press the “ T ” button to set the period of time to inform users to stand up. Each press of the “ T ” button leads to an 0.5-hour increment.
The maximal setting of time is 2 hours. After setting a period of time, the display will flash for seconds and it will automatically return to display the current desk height. Then the indicator light on the top right (the light of CT-09J is on the top left) of the panel will be on. When the unit emits 5 beeps (CT-09J's vibrates 10 times), it reminds users that the set time is up.
To cancel the timer, repeatedly press the “ T ” button until the display shows the current height and the indicator light on the top right is off.

Push-Button Control Panel - CT-05 & Control Box

Touch-screen Control Panel - CT-06 & Control Box

Push-Button Control Panel - CT-07 & Compact Control Box

Touch-screen Control Panel - CT-08 & Compact Control Box

Touch-screen Control Panel - CT-09J & Compact Control Box
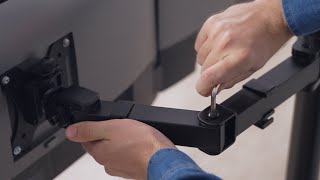
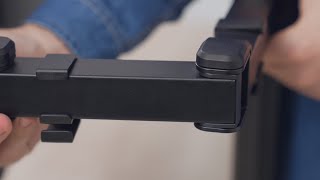
a). Tighten the clamp firmly, or the monitor stand will be shaky. For future use, don't discard the supplied Allen Key or other small parts that come with the package - store them properly.
b). The weight and size of the monitor SHOULD NOT exceed the maximum limits as found in the manual, or the arm can't support it.
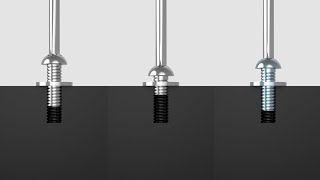
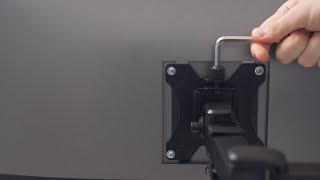
c). To correctly install the screws, select one that best fits the mounting holes of the monitor arm. Neither too shallow nor too deep, or it may cause damage to the monitor arm. Besides, ensure the screw is threaded properly into the hole.

C-clamp monitor arm installation tips
Monitor weight and size limitation
How to correctly install the screws?
The monitor arm will bounce and move if the spring tension is not suitable. Once the monitor arm drops, turn the adjustment screw clockwise with the Allen Key, while if it raises, turn the screw counter-clockwise until it can stay in a horizontal position.
P.S. (For LDT14 & LDT45) DO NOT loosen the two screws located on the upper arm as damage may occur to the product.
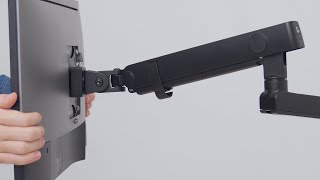
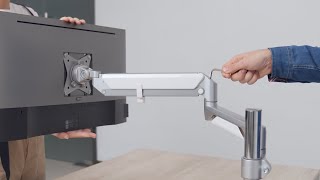
Problem-solving tips for Mechanical Spring monitor arms
The monitor arm will bounce and move if the spring tension is not suitable. To solve this problem, firmly hold the monitor arm horizontally and position the arm. If the monitor arm drops, turn the adjustment screw counter-clockwise with the Allen Key, while turning the adjustment screw clockwise if the arm rises until it stays in a horizontal position.
Problem-solving tips for Gas Spring monitor arms
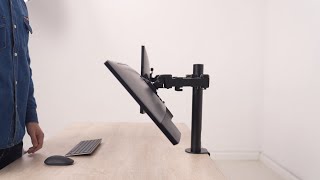
a). Can not move the monitor.
DO NOT overtighten the tension screw, or the monitor arm may not move.

DO NOT overtighten the screws between two joints, or you can't move your arm.
DO NOT overtighten the screws behind the VESA plate, or you can't move your screens.
b). Monitor dropping from the position.
After a period of use, the fasteners may require re-tightening. Turn the head of the fastener clockwise.
c). Monitors are not aligned.
When using a dual monitor arm, if two monitors are not aligned, adjust the adjustment screws behind the VESA plate and reposition the screens to the same height.
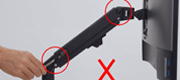
d). How to use the handle correctly?
DO NOT hang anything on the handle, which should only be used to position the monitors to a comfortable viewing angle.
Can not move the monitor
Monitor dropping from the position
Monitors are not aligned

How to use the handle correctly?
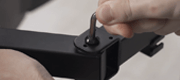
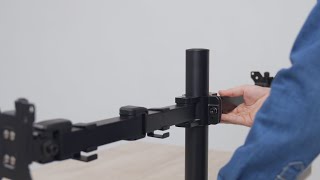
a). Monitor arm joints are loose.
Tighten the bolts clockwise with the Allen Key.
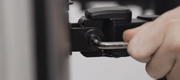
b). Monitor arms drop down from the pole.
Tighten the screws clockwise with Allen Key.
c). Monitors drift forward or backward.
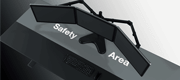
When using a multi-monitor arm stand, keep the monitors in the safe desktop area so that they won't fall forward or backward.
Monitor arm joints are loose
Monitor arms drop down from the pole
Monitors drift forward or backward
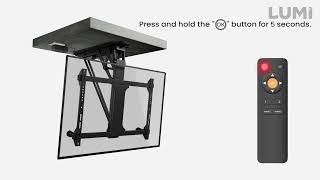
1. The buzzer constantly gives out alarm sound (the error of positioning signal) or makes abnormal noise.
a). Reset the system:
Press and hold the " " button for 5 seconds. Mount will retract to the highest position, that means the system has been successfully reset.
b). If the alarm sound continues, please contact us to replace the product.
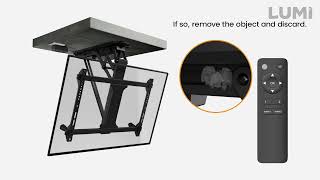
2. The TV mount stops moving during operation and emits a long beep.
a). Check to see if a foreign object is impeding the mount from moving. If so, remove the object and discard.
b). The weight of TV may exceed the maximum weight limitation of the mounting system.
c). The motor wire may be broken. Reset the system. If the problem still exists, contact your place of purchase for replacement.
3. The buzzer makes a "beep beep" (2 beeps) once.
This means Over-Current Protection. Operate the mount up and down for 2 minutes and it will stop at a certain position. After 18 minutes, cut off the power adaptor and plug it again. And then the mount can normally work. Besides, overweight and broken motor are also possible reasons.
Note: Over-Current Protection is a normal design to protect the motor. No need to worry.
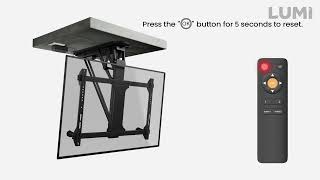
4. The buzzer makes a "beep beep" (2 beeps) twice.
This means Sensor Indicates the Mount is Over Range. Cut off the power adaptor and plug it again, and then press the "" button for 5s to reset.
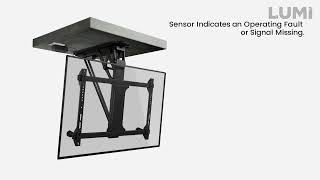
5. The buzzer makes a "beep beep" (2 beeps) three times.
This means Sensor Indicates an Operating Fault or Signal Missing. It is relatively complicated condition. If happening, please contact your place of purchase for help.
6. The buzzer makes a "beep beep" (2 beeps) four times.
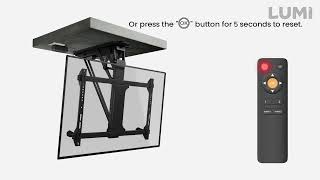
This means the Motor Reverses.
a). Press the " " button to get back, or press the "" button for 5s to reset.
b). If the motor reverses making the mount stuck on the top, remove the motor belt, reassemble it and reset.
1-The buzzer constantly gives out alarm sound or makes abnormal noise
2-The TV mount stops moving during operation and emits a long beep

3-The buzzer makes a ''beep beep'' (2 beeps) once
4-The buzzer makes a ''beep beep'' (2 beeps) twice
5-The buzzer makes a ''beep beep'' (2 beeps) three times
6-The buzzer makes a ''beep beep'' (2 beeps) four times
1. TV Mount
a). The system may have an error.
Check if the unit beeps three times after pressing the button. If so, please reset the system. Press and hold the "" button for 5 seconds. Mount will retract to the highest position, that means the system has been successfully reset.
b). The system may be overheating. (PLB Series not included)
Check if the unit beeps four times after pressing the button. If so, allow the unit to cool down and return to room temperature. (about 30 minutes)
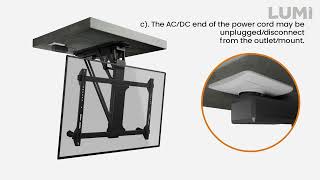
c). The AC/DC end of the power cord may be unplugged/disconnect from the outlet/mount.
Check the connection to ensure the unit has power.
d). Incorrect operation.
Check if the unit beeps once after pressing the button. If so, please follow the instructions found in the manual to properly operate the mount.
2. Remote Control
a). The remote-control operating distance maybe too far or not in range of the mount.
Acceptable range should be less than 30 feet (10m).
b). The batteries in the remote control may be low or dead.
Replace the batteries.
c). The remote control may be broken.
Check to see if the indicator LED found on the remote lights when a button is pressed. If not, contact your place of purchase for a replacement.
Possible reasons motorized mount does not respond to remote control
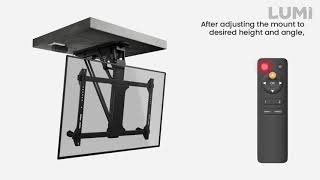
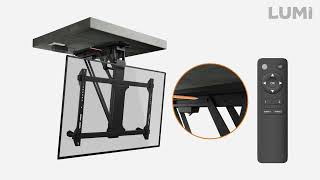
1. Memory Setting
After adjusting the mount to desired height and angle, press the " " or "
 " button for 1 second and you will hear a beep, indicating that the current position has been saved to memory. The "" and
"" buttons can each store a different position.
2. Recall Memory
Press the " " or "
 " button and the mount will automatically get to the position saved in the corresponding button "" or "".
How to save and recall desired positions
To solve some problems of motorized products, resetting the system is a common method.
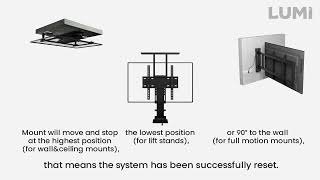
Press and hold the "" button for 3~5 seconds. Mount will move and stop at the highest position (for wall&ceiling mounts), the lowest position (for lift stands), or 90° to the wall (for full motion mounts), that means the system has been successfully reset.
How to Reset the System
Step 1: When the mount is powered on, press the small button on the control box with a thin tool as shown (take PLB-M0544 as an example). The unit emits a beep, indicating that the control box is on standby for program coding.

Step 2: Press the " " button on the remote control, and the control box repeatedly beeps for about 10 seconds indicating that the remote control is being programmed. The process will be finished automatically until you can’t hear a beep any longer.
Note: The TV Mount can be matched with up to 20 remote controllers. To clean up the data of all the remote controllers, press and hold the code matching button for 5 seconds then release. The unit will emit two beeps confirm the successful clean up and vice versa.
How to Code Remote Controller and Control Box
Every remote controller included in the package is exclusive for the corresponding LUMI product, which means any other brand’s remote controller cannot work with LUMI’s products. Because the remote controller is independent research and development product ONLY for LUMI with a 2.4Hz radio frequency.
If your remote controller is broken, please contact your place of purchase for a replacement.
Exclusive Use of the Remote Controller
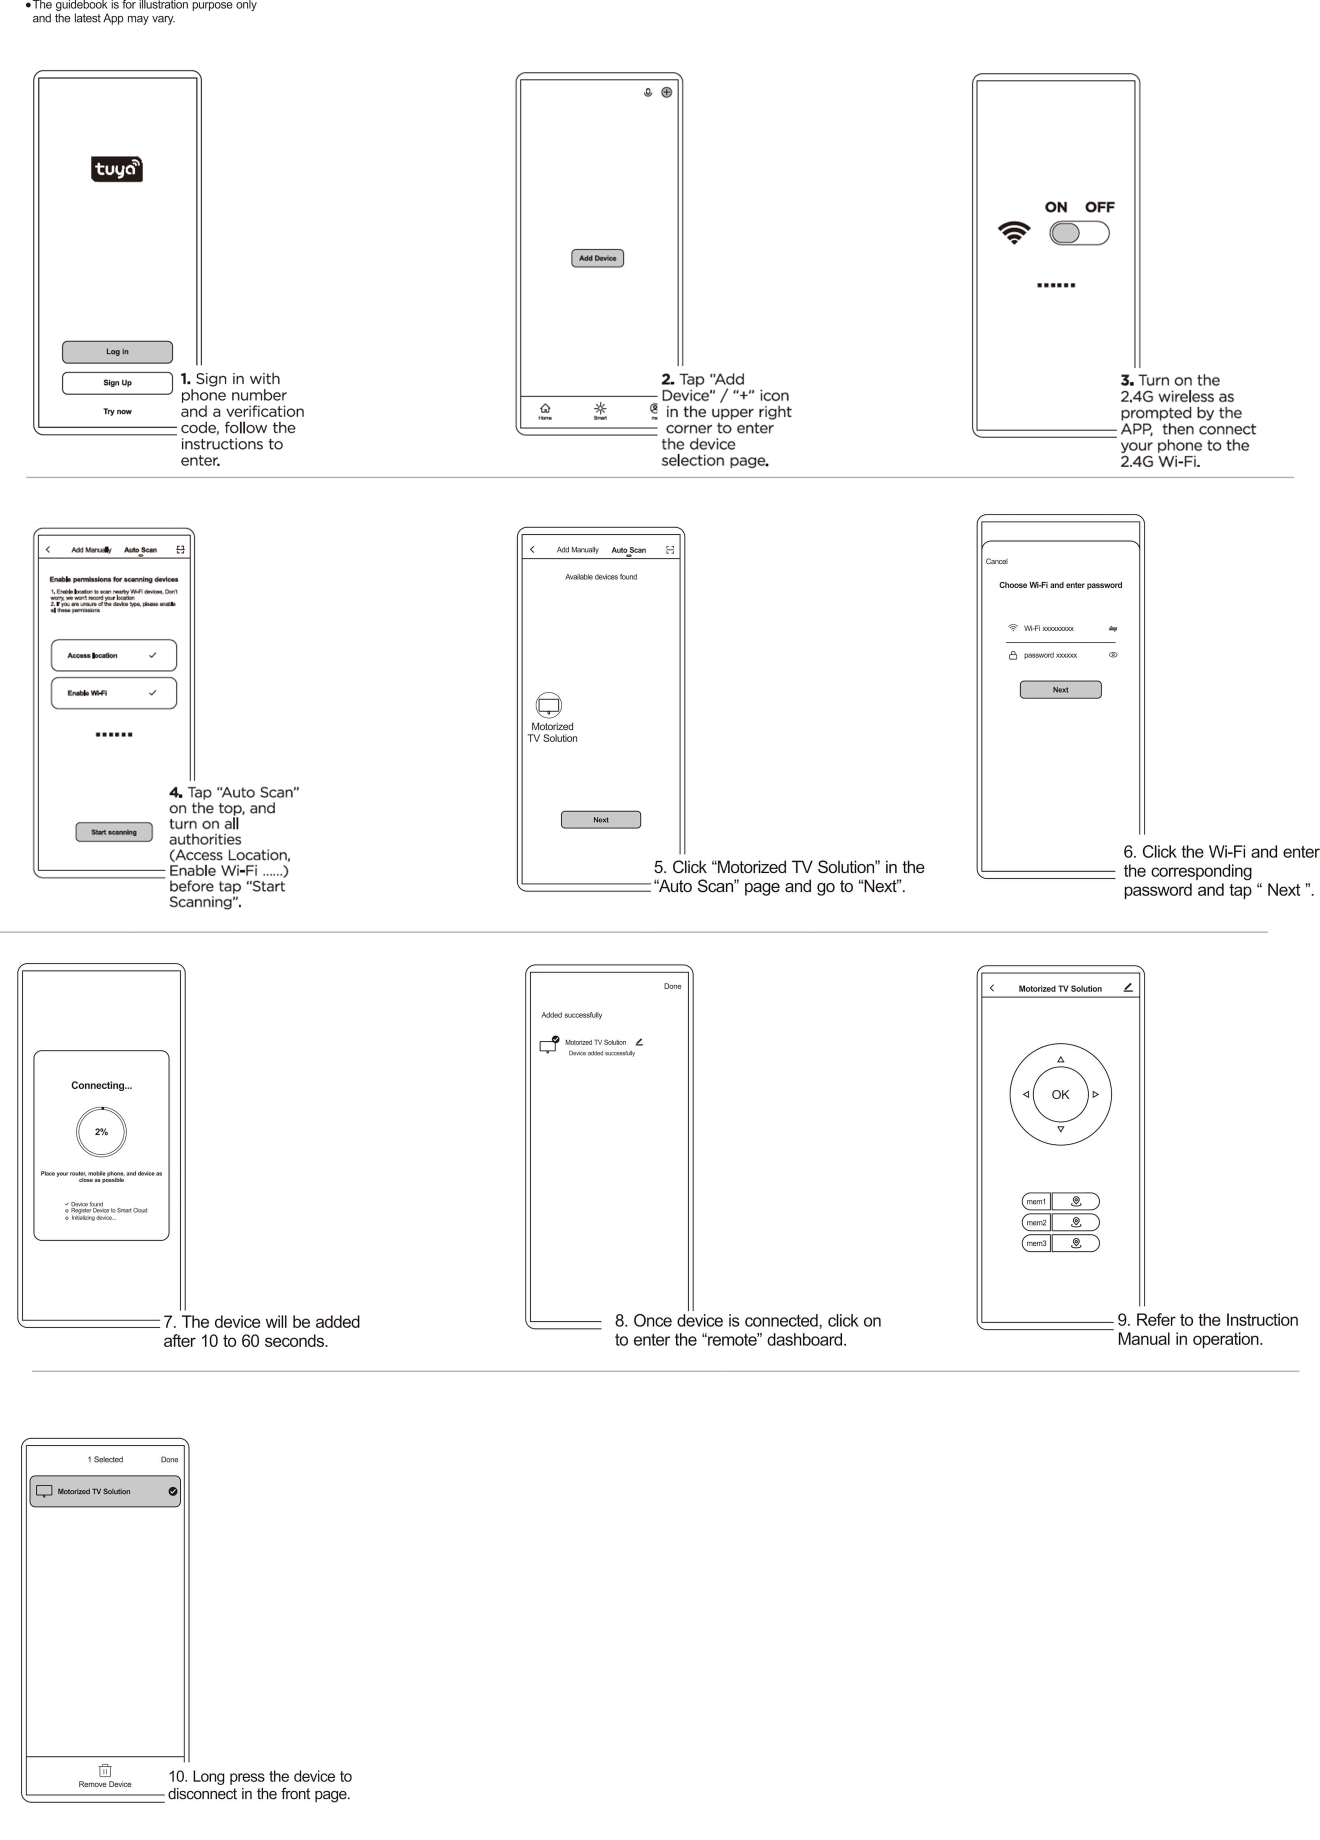
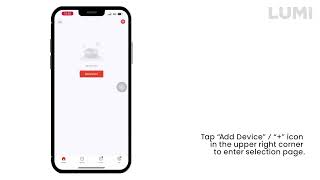
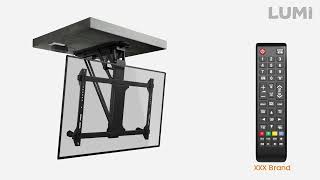
Guide of Tuya App Installation and Remote
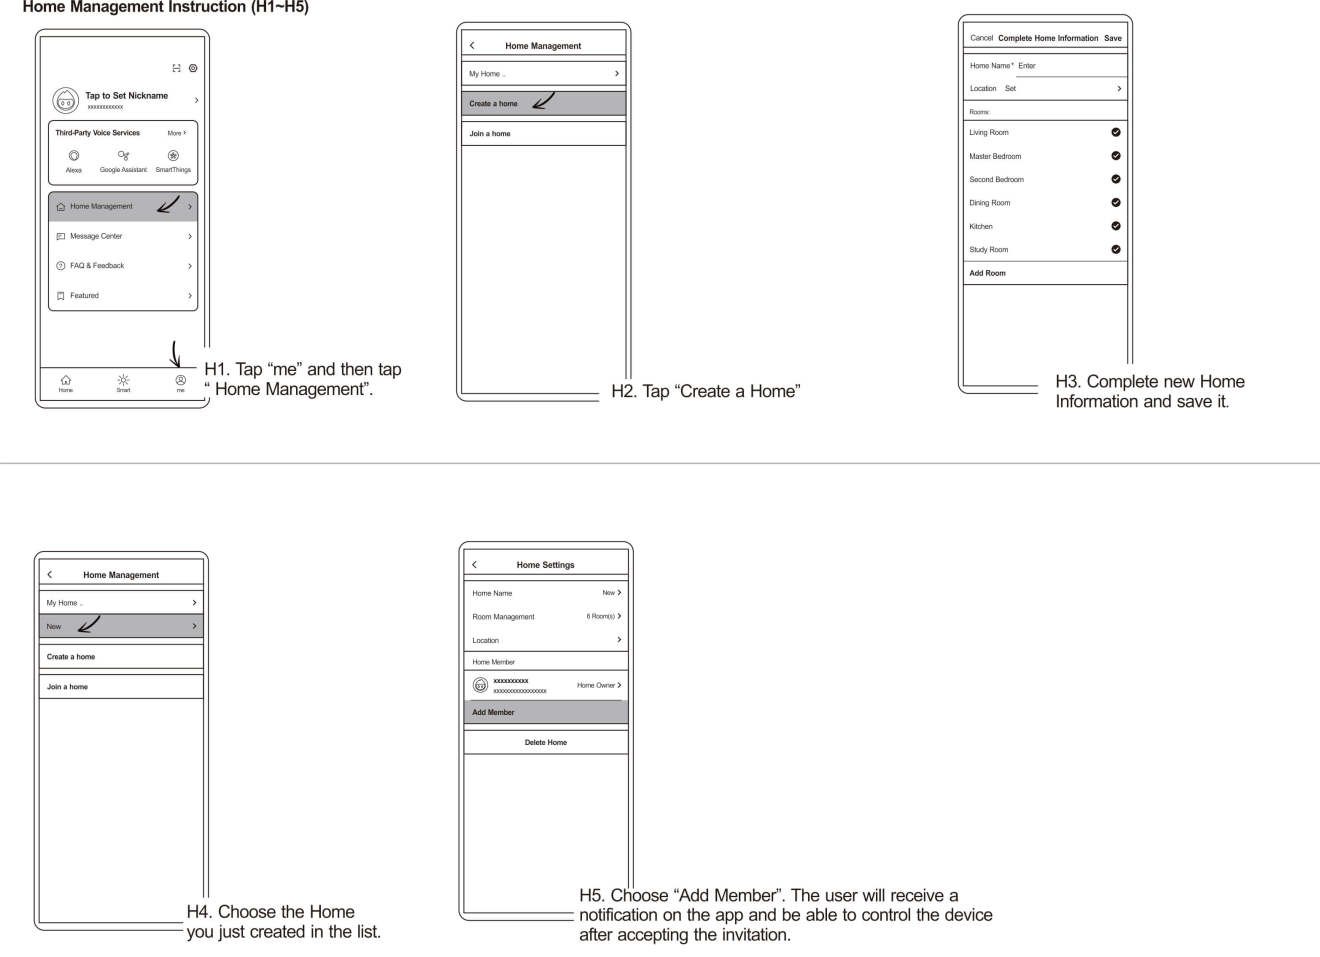

Home Management Instruction of Tuya App
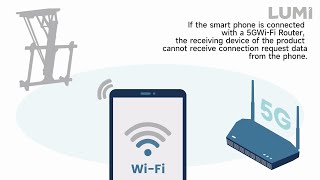
1. 5G Wi-Fi Router (the most possible reason)
If the smart phone is connected with a 5G Wi-Fi Router, the receiving device of the product cannot receive connection request data from the phone.
2. Enterprise WPA
The Wi-Fi router uses Enterprise WPA which is not supported by the receiving device of the product.
3. UPNP (Universal Plug-n-Play)
Some routers disable UPNP, so that the device cannot be searched. (Some routers disable UPNP but do not disable the multicast address and port corresponding to UPNP, so this problem will not be caused.)
4. Port Restriction
Some routers set port restrictions, that is, only common ports such as port 80 are allowed to be used, which will result in failure to search for settings and control devices.
5. AP Isolation of Public Places
Wi-Fi hotspots in public places are often set with AP isolation, which isolates all clients connected to this hotspot and cannot access each other, resulting in no device search.
6. Router Connection Limit
Some routers have a connection limit, for example, only 16 clients can be connected at most, but more than 16 terminals are actually trying to connect, which will cause the clients to keep preempting the connection and the device cannot work properly (the device can find the network but can't surf the Internet).
7. Poor Network Environment
If the network environment is very poor, or the router is too far away and the signal is too weak, it will also cause the device to fail to be added. In this case, it may be successful after several attempts.
8. Different National Standard between Wi-Fi Device and Router
The Wi-Fi device and the router do not have the same national standard, and the inconsistency of the Wi-Fi channel may cause the connection to fail.
9. Other Possible Conditions
a). The router is set to static IP address assignment.
b). The router has set MAC address restrictions, and only the specified range of MAC addresses can be connected.
c). The router is set with an internet portal, that is, after connecting to the router, a web page will pop up automatically or manually, and the user needs to enter a password to access the Internet; if the user does not enter a confirmation for a period of time, the network connection will be disconnected.
The Reasons for failure to add the device by smart phone