以下の製品カテゴリを選択してください。
この修理ガイドは、当社の昇降デスク電気システムの異常な動作によって引き起こされる小さな問題を特定して解決するのに役立つようことを目的としています。以下のガイドで問題を解決できない場合は、購入先に連絡してサポートを受けるか、アクセサリーを交換してください。
1. コントロールパネル用 CT-05/CT-06
* E01: 過負荷保護が発生しました。 デスクトップからアイテムを取り除いてください。
* E02/HOT:コントローラーの過熱 が発生しました。 動作を停止し、机が冷えるのを待ち、9分間アイドル状態を保ちます。
* E03:デスクが間違った方向に移動します。 接続を確認するか、モーターコードを交換してください。
* E04: カラムは一緒になりません。 カラム と コントロールボックスの間のケーブルを抜き差ししてから、" "ボタンを長押ししてシステムをリセットしてください。 上 " と " 下
* E05:コードが断線している可能性があります。 接続を確認するか、モーターコードを交換してください。
* E06:衝突回避システムが作動しました。 移動範囲内の物体をすべて取り除いてください。
* E08: コントロールパネルが切断されています。接続を確認してください。 コントロールパネルと コントロールボックスの間のケーブルを抜き差ししてください。
* E10: 以下は3つの可能性があります - a). コントロールボックスの位置がずれています。コントロールボックスが取扱説明書に従ってデスクフレームに正しく取り付けられているか、平らな面にしっかりと配置されていることを確認してください。 b). 電源コードがコントロールボックスを引っ張っています。ケーブルを管理し、コントロールボックスを引っ張らないようにします。c).衝突回避システムが作動しました。可動範囲内のすべての物体を取り除きます。
* E12/E13: 電気的な問題が発生しました。 電源を切って、再度差し込んでください。
* E14: 短絡。 コントロールボックスを交換します。
* E15: リセット失敗。 列を確認して交換してください。
* E18: 電気的な問題が発生しました。 電源を切って、再度差し込んでください。 動作しない場合は、コントロール ボックスを交換してください。
* E19: リセットプロセスが中断されます。指示に厳密に従ってシステムをリセットしてください。プロセスが完了するまで、" 上 " と " 下 "ボタンを押し続けます。
* E22: 衝突回避システム異常。 コントロールボックスを交換します。
2. コントロールパネル用 CT-07/CT-08/CT-09J
* E01/E07: 電気的な問題が発生しました。 電源を切って、再度差し込んでください。
* HOT: コントローラーの過熱 が発生しました。 動作を停止し、机が冷えるのを待ち、18分間アイドル状態を保ちます。
* E02: 列が一致しません。 システムを再起動します。
* E04: コントロールパネルが切断されています。接続を確認してください。 コントロールパネル と コントロールボックスの間のケーブルを抜き差しします。
* E05: 衝突回避システムが作動しました。 移動範囲内の物体をすべて取り除いてください。
* E06: 電気的な問題が発生しました。 電源を切って、再度差し込んでください。 動作しない場合は、コントロール ボックスを交換してください。
* E08: If E08 と RST error code displays, there are 3 possibilities - a). The control box is out of position. Please make sure the control box is properly attached to the desk frame as the instruction manual or placed well on the even surface. b). The power cords have pulled the control box. Manage the cables and keep them from pulling the control box. c). Collision avoidance system has activated. Remove all the objects within the range of motion. To reset the system, please hold together and long press the " 上 " と " 下 " buttons.
* E11/E21/E31: モーターコードが外れた。接続を確認してください。 カラム と コントロールボックスの間のケーブルを抜き差ししてください。
* E12/E22/E32: 電気的な問題が発生しました。 電源を切って、再度差し込んでください。 動作しない場合は、コントロール ボックスを交換してください。
* E13/E23/E33: モーター線が断線している可能性があります。 接続を確認するか、モーターコードを交換してください。 E13 は M1 コネクタに対応し、E23 は M2 に対応し、E33 は M3 に対応します。
* E14/E24/E34: ホール線が断線している可能性があります。 接続を確認するか、モーターコードを交換してください。 E14 は M1 コネクタに対応し、E24 は M2 に対応し、E34 は M3 に対応します。
* E15/E25/E35: 短絡。 モーターまたはコラムを交換してください。 E15 は M1 コネクタ、E25 は M2 コネクタ、E35 は M3 コネクタに対応します。
* E16/E26/E36: 過負荷によりモーターが駆動できなくなります。 デスクトップからアイテムを削除し、システムをリセットします。
* E17/E27/E37: 机が間違った方向に動く。 接続を確認するか、モーターコードを交換してください。 E17 は M1 コネクタ、E27 は M2 コネクタ、E37 は M3 コネクタに対応します。
* E18/E28/E38: Overload has occurred. Please remove the items from the desktop.
* E42: メモリを読み取れません。 電源を切って、再度差し込んでください。 動作しない場合は、コントロール ボックスを交換してください。
* E43: 衝突回避システム異常。 コントロールボックスを交換します。
3. コントロールパネル用 T150/C150
* ER1: Overload protection has occurred. Please remove the items from the desktop, unplug and re-plug the power after 10 seconds.
* ER2/HOT: コントローラーの過熱 が発生しました。 動作を停止し、机が冷えるのを待ち、18分間アイドル状態を保ちます。
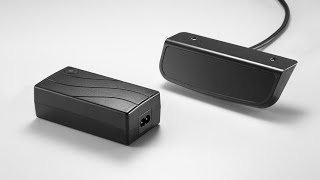
* ER3: The motor cords were disconnected. Please check the connection. Unplug and reinsert the cable between the カラム と AC adapter . Then reset the system.
* ER5: There are 2 possibilities - a). Voltage overload has occurred. Please replace the AC Adapter. b). Overload protection has occurred. Please remove the items from the desktop, unplug and re-plug the power after 10 seconds.
4. コントロールパネル用 CT-10
* HOT: コントローラーの過熱 が発生しました。 動作を停止し、机が冷えるのを待ち、18分間アイドル状態を保ちます。
* E01: Overvoltage has occurred. Please unplug and reinsert the power cable. If the problem still exists, please replace the control box.
* E02: Column problem has occurred. Please reset the system.
* E04: The control panel is disconnected. Please check the connection. Unplug and reinsert the cable between the コントロールパネル と コントロールボックスの間のケーブルを抜き差ししてください。
* - - -: Collision avoidance system has activated. Please remove all the objects within the range of motion.
* E06/E07: The voltage was too low. Please unplug and reinsert the power cable. If the problem still exists, please replace the control box.
* E08: There are 3 possibilities - a). The control box is out of position. Please make sure the control box is properly attached to the desk frame as the instruction manual or placed well on the even surface. Then reset the system. b). The power cords have pulled the control box. Manage the cables and keep them from pulling the control box. Then reset the system. c).Collision avoidance system has activated. Remove all the objects within the range of motion. Then reset the system.
* E11/21: The motor cords were disconnected. Please check the connection. Unplug and reinsert the cable between the motor cords と コントロールボックスの間のケーブルを抜き差ししてください。 If the problem still exists, replace the motor cords or columns.
* E12/E22: Electrical problem has occurred. Please unplug and reinsert the power cable. If the problem still exists, please replace the control box.
* E13/E23: The motor cables were broken. Please replace the motor cords or columns.
* E14/E24: The motor cables were broken. Please check the connection. Unplug and re-insert the motor cords into the control box. If the problem still exists, replace the motor cords or columns.
* E15/E25: Short circuit has occurred. Please replace the motors or columns.
* E16/E26: Overload protection has occurred. Please remove the items from the desktop. Then reset the system.
* E17/E27: Desk moves in wrong direction. Please replace the motor cords or columns.
* E18/E28: Overload protection has occurred. Please remove the items from the desktop.
* E41/42/43: The control box was broken. Please replace the control box.
5. コントロールパネル用 CT-11
* HOT: コントローラーの過熱 が発生しました。 動作を停止し、机が冷えるのを待ち、18分間アイドル状態を保ちます。
* E01: Overvoltage has occurred. Please unplug reinsert the power cable. If the problem still exists, please replace the control box.
* E04: The control panel is disconnected. Please check the connection. Unplug and reinsert the cable between the コントロールパネル と コントロールボックスの間のケーブルを抜き差ししてください。
* - - -: Collision avoidance system has activated. Remove all the objects within the range of motion.
* E06/E07: The voltage was too low. Please unplug and reinsert the power cable. If the problem still exists, please replace the control box.
* E11: The motor cords were disconnected. Please check the connection. Unplug and reinsert the cable between the motor cords と コントロールボックスの間のケーブルを抜き差ししてください。 If the problem still exists, replace the motor cords or columns.
* E12: Electrical problem has occurred. Please unplug and reinsert the power cable. If the problem still exists, please replace the control box.
* E13: The motor cables were broken. Please replace the motor cords or columns.
* E14: The motor cables were broken. Please check the connection. Unplug and re-insert the motor cords into the control box. If the problem still exists, replace the motor cords or columns.
* E15: Short circuit has occurred. Please replace the motors or columns.
* E16: Overload protection has occurred. Please remove the items from the desktop. Then reset the system.
* E17: Desk moves in wrong direction. Please replace the motor cords or columns.
* E18: Overload protection has occurred. Please remove the items from the desktop.
* E41/42/43: The control box was broken. Please replace the control box.

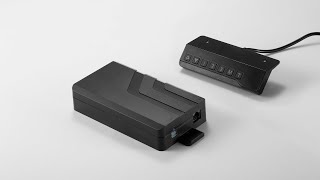
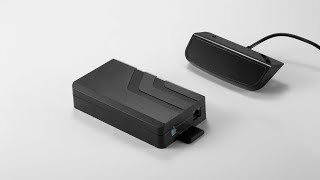
押しボタンコントロールパネル - CT-05 & コントロールボックス

タッチスクリーンコントロールパネル - CT-06 & コントロールボックス

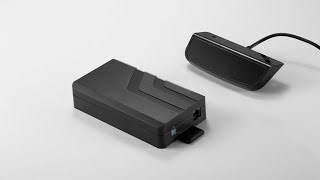
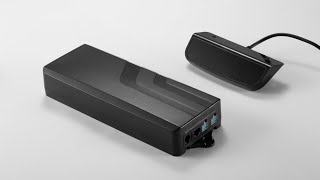
押しボタンコントロールパネル - CT-07 & コンパクトコントロールボックス

タッチスクリーンコントロールパネル - CT-08 &コンパクトコントロールボックス

タッチスクリーンコントロールパネル - CT-09J &コンパクトコントロールボックス

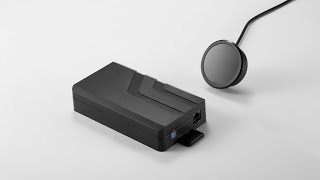
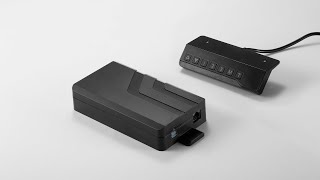
Push-Button Control Panel - T150 & Control Box

Touch-Screen Control Panel - C150 & Control Box
以下は4つのカスタムオプションがあります:
1. 最小および最大の高さ制限
2. 衝突防止感度
3. 現在の高さ表示
4. Child lock function
1. 最小および最大の高さ制限
a). コントロールパネル用 CT-05/CT-06
最小高さ制限: Long press " M " と " T " buttons simultaneously for about 5 seconds until the unit emits one beep and the display flashes the Current Minimal Height Limit ("62.0" by default), then press " 上 " または " 下 " button to adjust the Min. Height Limit. The adjustable range is from 62 - 118 cm (24.4 - 46.4 inches) . Press " 1 " to save, and press " T " to finish the adjustment.
最大高さ制限: Long press " M " と " T " buttons simultaneously for about 5 seconds until the unit emits one beep and the display flashes the Current Minimal Height. Press " M " button and the Current Maximum Height Limit ("128" by default) is displayed. Press " 上 " または " 下 " button to set the Max. Height Limit. The adjustable range is from 72 - 128 cm (28.3 - 50.4 inches) . (Please Note: The display won't count the number immediately when you are in metric system. Keep pressing until the display count to your desired height limit.) Press " 1 " to save, and press " T " to finish the adjustment.
b). コントロールパネル用 CT-07/CT-08/CT-09J
最小高さ制限: Long press " M " と " T " buttons simultaneously for about 5 seconds until the unit emits one beep and the display flashes " S-1 ". Press " M " button once and the Current Minimal Height Limit is displayed ("62.0" by default), then press "Up" or "Down" button to set your desired height, and press "M" again to save.
最大高さ制限: Long press " M " と " T " buttons simultaneously for about 5 seconds until the unit emits one beep and the display flashes " S-1 ". Press " 上 " または " 下 " button to switch from" S-1 " to " S-7 ". When the display is flashing " S-2 ", press " M " button once and the Current Maximum Height Limit is displayed. Press " 上 " または " 下 " button to set your desired height, and press " M " again to save.
c). For Control Panel CT-10
Set the Minimal & Maximum height limit: Move the desk to your desired height. Long press " + " と " - " buttons simultaneously for approximately 5 seconds until the unit emits a beep. Then the setting is finished.
d). For Control Panel CT-11
Set the Minimal & Maximum height limit: Move the desk to your desired height. Long press " "or " " buttons simultaneously for approximately 5 seconds until the unit emits a beep. Then the setting is finished.
2. Collision Avoidance Settings
(GYRO senses abnormal motion / CURRENT senses impact with objects)
a). コントロールパネル用 CT-05/CT-06
CURRENT Sensor - Adjusting the UPWARD/DOWNWARD Anti-Collision Sensitivity
Long press " M " と " T M CC- 上 " または " 下 " button to adjust the sensitivity. The higher the number, the higher the sensitivity of the unit. Press " 1 T
M " と " T M SC- 上 " または " 下 1 T
b). コントロールパネル用 CT-07/CT-08/CT-09J
S-3/S-4
S-3
M " と " T 上 M 上 "または " 下 M
S-4
M " と " T 上 M 上 "または " 下 M
S-5
S-5
M " と " T 上 M 上 "または " 下 M
c). For Control Panel CT-10
S-3/S-4
Long press "
 ", then press "
+
" または "
-
" button to switch to " S-3". Press "
+
" または "
-
" button to adjust the sensitivity from level 1 to level 8. The higher the number, the higher the sensitivity of the unit.
", then press "
+
" または "
-
" button to switch to " S-3". Press "
+
" または "
-
" button to adjust the sensitivity from level 1 to level 8. The higher the number, the higher the sensitivity of the unit.
S-4
Long press "
", then press "
+
" または "
-
" button to switch to " S-4". Press "
+
" または "
-
" button to adjust the sensitivity from level 1 to level 8. The higher the number, the higher the sensitivity of the unit.
S-2
Long press "
", then press "
+
" または "
-
" button to switch to " S-2". Press "
+
" または "
-
" button to adjust the sensitivity from level 1 to level 8. The higher the number, the higher the sensitivity of the unit.
d). For Control Panel CT-11
S-3/S-4
S-3
Long press " S ", then press " " or" " button to switch to " S-3". Press " S "or " " button to adjust the sensitivity from level 1 to level 8. The higher the number, the higher the sensitivity of the unit.
S-4
Long press " S ", then press " " or" " button to switch to " S-4". Press " S "or " " button to adjust the sensitivity from level 1 to level 8. The higher the number, the higher the sensitivity of the unit.
3.
a). コントロールパネル用 CT-05/CT-06
M " と " T M 上 "または " 下 1 T
b). コントロールパネル用 CT-07/CT-08/CT-09J
M " と " T 上 S-6 M 上 "または " 下 M
c). コントロールパネル用 CT-10
Reset the system and measure the actual height (includes desktop) of the desk. LONG PRESS "
", then press "
+
" または "
-
" button to switch to "S-5". Press "
+
" または "
-
" button to set the current display height.
d). コントロールパネル用 CT-11
Reset the system and measure the actual height (includes desktop) of the desk. LONG PRESS " S ", then press " " または " " button to switch to "S-5". Press " S "or " " button to set the current display height.
4.
a). コントロールパネル用 CT-05/CT-06
M " と " T M A-0 OFF; " A-1 ON Up "または " Down 1 T
b). For Control Panel CT-07/CT-08/CT-09J
Long press " M " and " T " buttons simultaneously for about 5 seconds until the unit emits one beep and the display flashes " S-1 ". Press " Up " or " Down " button to switch from " S-1 " to " S-7 ". When display is flashing " S-7 ", press " M " button once and the Current Screen Lock Setting is displayed. (" 1 " indicates function ON; " 0 " indicates OFF ). Press " UP " or " Down " button to set your desired locking function, and press " M " button again to save.

押しボタンコントロールパネル - CT-05 & コントロールボックス

タッチスクリーンコントロールパネル - CT-06 & コントロールボックス
押しボタンコントロールパネル - CT-07 & コンパクトコントロールボックス
タッチスクリーンコントロールパネル - CT-08 &コンパクトコントロールボックス
タッチスクリーンコントロールパネル - CT-09J &コンパクトコントロールボックス
a). コントロールパネル用 CT-05/CT-06
M
M
省電力モードでコントロール パネルを有効にするには、いずれかのボタンを押すだけです。 (10分以内にアクティベーションが行われないと、システムは省電力モードになり、ディスプレイは暗くなります。)
b). コントロールパネル用 CT-07/CT-08/CT-09J
M
M
省電力モードでコントロール パネルを有効にするには、いずれかのボタンを押すだけです。 (10分以内にアクティベーションが行われないと、システムは省電力モードになり、ディスプレイは暗くなります。)
c). For Control Panel C150
To lock the screen, long press " M " button until the "---" is displayed.
To unlock the screen, long press " M " button until the current height is displayed.
省電力モードでコントロール パネルを有効にするには、いずれかのボタンを押すだけです。 (1分以内にアクティベーションが行われないと、システムは省電力モードになり、ディスプレイは暗くなります。)
d). For Control Panel CT-10
To lock the screen, long press "
" and "
+
" buttonssimultaneously until the "
Loc
" is displayed.
To unlock the screen, long press together "
" and "
-
" buttons simultaneously until the current height is displayed.
e). For Control Panel CT-11
To lock the screen, long press together " S " and " " buttons simultaneously until the " Loc " is displayed.
To unlock the screen, hold and press together " S " and " " buttons until the current height is displayed.
押しボタンコントロールパネル - CT-05 & コントロールボックス

タッチスクリーンコントロールパネル - CT-06 & コントロールボックス

押しボタンコントロールパネル - CT-07 & コンパクトコントロールボックス
タッチスクリーンコントロールパネル - CT-08 &コンパクトコントロールボックス

タッチスクリーンコントロールパネル - CT-09J &コンパクトコントロールボックス

Touch-Screen Control Panel - C150 & Control Box
a). コントロールパネル用 CT-05/CT-06
上
" と "
下

b). コントロールパネル用 CT-07/CT-08/CT-09J
1.
2.
1. Factory Reset:
上
2. Reset of the Custom Programming:
Long press " M ", " T ", と " 上
c). For Control Panel C150/T150
Unplug and re-plug the power to your desk whenever you want to reset the system. Long press "
" buttons until the display shows "
".The desk start moving downward and to the lowest position. Keep pressing until the display shows the current desk height. Then the reset process is finished.
d). For Control Panel CT-10
Here are 2 reset options:
1. Factory Reset
2. Reset of the Custom Programming
1. Factory Reset:
Long press the " - " button until the desk start moving downward and to the lowest position, then release the button. Long press the " - " button again for approximately 5 seconds, the display will show " 000 " and the desk start moving further downward and the current desk height is displayed. Then reset process is finished.
2. Reset of the Custom Programming:
Long press " + " と " - " buttons simultaneously. The unit beeps and the " 000 " is displayed, then release two buttons. Long press " - " buttons until the desk start moving downward and to the lowest position and the current desk height is displayed. The reset process is finished, all custom settings have been erased.
e). For Control Panel CT-11
Here are 2 reset options:
1. Factory Reset
2. Reset of the Custom Programming
1. Factory Reset:
Long press the " " button until the desk start moving downward and to the lowest position, then release the button. Long press the " " button again for approximately 5 second, the display will show " 000 " and the desk start moving further downward and the current desk height is displayed. Then reset process is finished.
2. Reset of the Custom Programming:
Long press " "or " " buttons simultaneously. The unit beeps and the " 000 " is displayed, then release two buttons. Long press " " buttons until the desk start moving downward and to the lowest position and the current desk height is displayed. The reset process is finished, all custom settings have been erased.

押しボタンコントロールパネル - CT-05 & コントロールボックス
タッチスクリーンコントロールパネル - CT-06 & コントロールボックス
押しボタンコントロールパネル - CT-07 & コンパクトコントロールボックス

タッチスクリーンコントロールパネル - CT-08 &コンパクトコントロールボックス

タッチスクリーンコントロールパネル - CT-09J &コンパクトコントロールボックス

Push-Button Control Panel - T150 & Control Box

Touch-Screen Control Panel - C150 & Control Box
a). コントロールパネル用 CT-05/CT-06/CT-07/CT-08/C150/T150
To save a memory position, press
M
” button and the display will flash “
 ”. While the “
S
-” is displayed, press the button "
1
", "
2
" "
3
".
”. While the “
S
-” is displayed, press the button "
1
", "
2
" "
3
".
To call a stored position, press memory button " 1 ", " 2 " " 3 ". and the system will start moving to the desired memory position. The display will count the height as it is driving to the memory position. Press any button to stop the motion.
b). コントロールパネル用 CT-09J
To save a memory position, press “
M
” button and the display will flash “
”. While the “
S
-” is displayed, press the button "
1
" or "
2
".
To call a stored position, press memory button " 1 "or " 2 ". and the system will start moving to the desired memory position. The display will count the height as it is driving to the memory position. Press any button to stop the motion.
c). For Control Panel CT-10
To save a memory position, press the “
” button and the display will flash “
”. While the "
S-
" is displayed, press the button "
I
" or "
II
".
To call a stored position, press memory button " I " or " II ", and the system will start moving to the desired memory position. The display will count the height as it is driving to the memory position. Press any button to stop the motion.
d). For Control Panel CT-11
To save a memory position, press the "
S
" button and the display will flash “
”. While the "
S-
" is displayed, press the button "
1
", "
2
", "
3
".
To call a stored position, press memory button " 1 ", " 2 ", " 3 ", and the system will start moving to the desired memory position. The display will count the height as it is driving to the memory position. Press any button to stop the motion.

押しボタンコントロールパネル - CT-05 & コントロールボックス

タッチスクリーンコントロールパネル - CT-06 & コントロールボックス

押しボタンコントロールパネル - CT-07 & コンパクトコントロールボックス

タッチスクリーンコントロールパネル - CT-08 &コンパクトコントロールボックス

タッチスクリーンコントロールパネル - CT-09J &コンパクトコントロールボックス
Push-Button Control Panel - T150 & Control Box
Touch-Screen Control Panel - C150 & Control Box
a). For Control Panel CT-05/CT-06/CT-07/CT-08/CT-09J/C150/T150
Press the “ T ” button to set the period of time to inform users to stand up. Each press of the “ T ” button leads to an 0.5-hour increment.
The maximal setting of time is 2 hours. After setting a period of time, the display will flash for seconds and it will automatically return to display the current desk height. Then the indicator light on the top right (the light of CT-09J is on the top left) of the panel will be on. When the unit emits 5 beeps (CT-09J's vibrates 10 times), it reminds users that the set time is up.
To cancel the timer, repeatedly press the “ T ” button until the display shows the current height and the indicator light on the top right is off.

押しボタンコントロールパネル - CT-05 & コントロールボックス

タッチスクリーンコントロールパネル - CT-06 & コントロールボックス

押しボタンコントロールパネル - CT-07 & コンパクトコントロールボックス

タッチスクリーンコントロールパネル - CT-08 &コンパクトコントロールボックス

タッチスクリーンコントロールパネル - CT-09J &コンパクトコントロールボックス
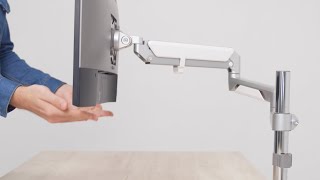
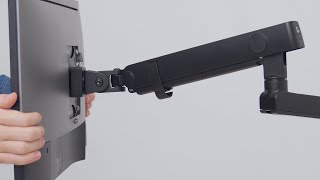
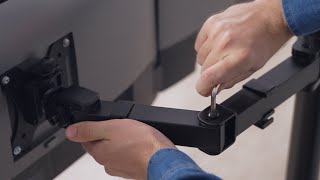
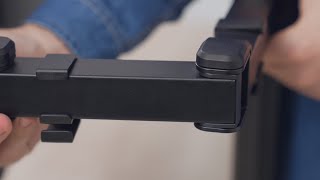
a). Tighten the clamp firmly, or the monitor stand will be shaky. For future use, don't discard the supplied Allen Key or other small parts that come with the package - store them properly.
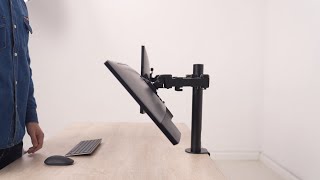
b). The weight and size of the monitor SHOULD NOT exceed the maximum limits as found in the manual, or the arm can't support it.
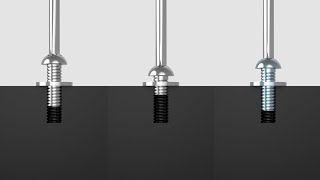
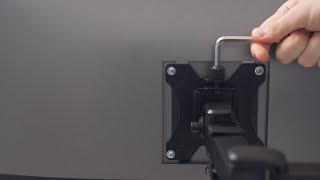
c). To correctly install the screws, select one that best fits the mounting holes of the monitor arm. Neither too shallow nor too deep, or it may cause damage to the monitor arm. Besides, ensure the screw is threaded properly into the hole.

C-クランプモニターアームの取り付けのチップス
モニターの重量とサイズの制限
ネジを正しく取り付ける方法とは?
The monitor arm will bounce and move if the spring tension is not suitable. Once the monitor arm drops, turn the adjustment screw clockwise with the Allen Key, while if it raises, turn the screw counter-clockwise until it can stay in a horizontal position.
P.S. (For LDT14 & LDT45) DO NOT loosen the two screws located on the upper arm as damage may occur to the product.
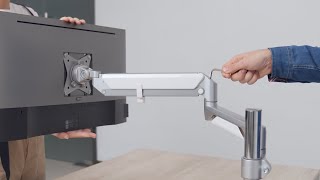
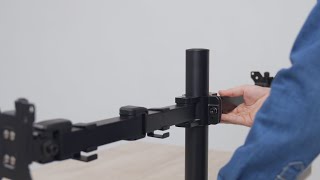
メカニカルスプリングモニターアームの問題解決のチップス
The monitor arm will bounce and move if the spring tension is not suitable. To solve this problem, firmly hold the monitor arm horizontally and position the arm. If the monitor arm drops, turn the adjustment screw counter-clockwise with the Allen Key, while turning the adjustment screw clockwise if the arm rises until it stays in a horizontal position.
ガススプリング式モニターアームの問題解決のチップス
a). モニターを動かせない場合.
DO NOT overtighten the tension screw, or the monitor arm may not move.

DO NOT overtighten the screws between two joints, or you can't move your arm.
DO NOT overtighten the screws behind the VESA plate, or you can't move your screens.
b). モニターがその位置から落ちる場合.
After a period of use, the fasteners may require re-tightening. ファスナーの頭を時計回りに回してください.
c). モニターがずれている場合.
When using a dual monitor arm, if two monitors are not aligned, adjust the adjustment screws behind the VESA plate and reposition the screens to the same height.
d). ハンドルを正しく使用する方法とは?
DO NOT hang anything on the handle, which should only be used to position the monitors to a comfortable viewing angle.
モニターを動かせない場合
モニターがその位置から落ちる場合
モニターがずれている場合

ハンドルを正しく使用する方法とは?
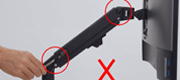
a). モニターアームの関節が緩んでいる場合.
六角レンチでボルトを時計回りに締めます.
b). モニターアームがポールから落ちる場合.
六角レンチでネジを時計回りに締めます.
c). モニターは前後にドリフトする場合.
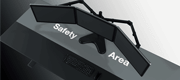
マルチモニターアームスタンドを使用する場合は、モニターが前後に倒れる可能性があるため、モニターを安全なデスクトップの範囲に置いてください.
モニターアームの関節が緩んでいる場合
モニターアームがポールから落ちる場合
モニターは前後にドリフトする場合
1. The buzzer constantly gives out alarm sound (the error of positioning signal) or makes abnormal noise.
a). Reset the system:
Press and hold the " " button for 5 seconds. Mount will retract to the highest position, that means the system has been successfully reset.
b). If the alarm sound continues, please contact us to replace the product.
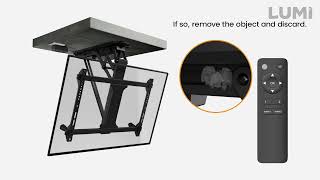
2. The TV mount stops moving during operation and emits a long beep.
a). Check to see if a foreign object is impeding the mount from moving. If so, remove the object and discard.
b). The weight of TV may exceed the maximum weight limitation of the mounting system.
c). The motor wire may be broken. Reset the system. If the problem still exists, contact your place of purchase for replacement.
3. The buzzer makes a "beep beep" (2 beeps) once.
This means Over-Current Protection. Operate the mount up and down for 2 minutes and it will stop at a certain position. After 18 minutes, cut off the power adaptor and plug it again. And then the mount can normally work. Besides, overweight and broken motor are also possible reasons.
Note: Over-Current Protection is a normal design to protect the motor. No need to worry.
4. The buzzer makes a "beep beep" (2 beeps) twice.
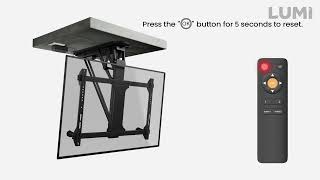
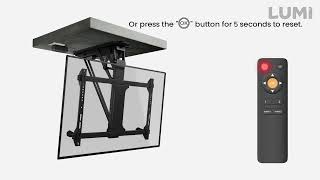
This means Sensor Indicates the Mount is Over Range. Cut off the power adaptor and plug it again, and then press the "" button for 5s to reset.
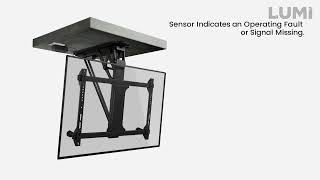
5. The buzzer makes a "beep beep" (2 beeps) three times.
This means Sensor Indicates an Operating Fault or Signal Missing. It is relatively complicated condition. If happening, please contact your place of purchase for help.
6. The buzzer makes a "beep beep" (2 beeps) four times.
This means the Motor Reverses.
a). Press the " " button to get back, or press the "" button for 5s to reset.
b). If the motor reverses making the mount stuck on the top, remove the motor belt, reassemble it and reset.
1-ブザーが常にアラーム音や異音を発している
2-動作中にテレビマウントの動きが止まり、長いビープ音が鳴ります

3-ブザーが「ピーピーピー」(2回)と鳴る
4-ブザーが「ピッピッピッピッ」と2回鳴る
5-ブザーが「ピーピーピー」(2回鳴る)と3回鳴る
6-ブザーが「ピーピーピー」(2回鳴る)と4回鳴る
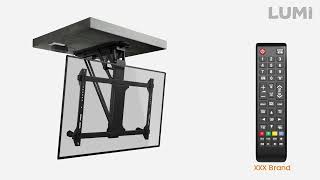
1. TV Mount
a). The system may have an error.
Check if the unit beeps three times after pressing the button. If so, please reset the system. Press and hold the "" button for 5 seconds. Mount will retract to the highest position, that means the system has been successfully reset.
b). The system may be overheating. (PLB Series not included)
Check if the unit beeps four times after pressing the button. If so, allow the unit to cool down and return to room temperature. (about 30 minutes)
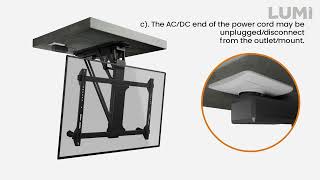
c). The AC/DC end of the power cord may be unplugged/disconnect from the outlet/mount.
Check the connection to ensure the unit has power.
d). Incorrect operation.
Check if the unit beeps once after pressing the button. If so, please follow the instructions found in the manual to properly operate the mount.
2. Remote Control
a). The remote-control operating distance maybe too far or not in range of the mount.
Acceptable range should be less than 30 feet (10m).
b). The batteries in the remote control may be low or dead.
Replace the batteries.
c). The remote control may be broken.
Check to see if the indicator LED found on the remote lights when a button is pressed. If not, contact your place of purchase for a replacement.
電動マウントがリモコンに反応しない原因の可能性
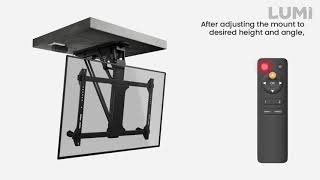
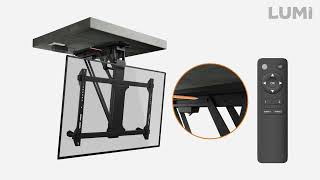
1. Memory Setting
After adjusting the mount to desired height and angle, press the " " or "
 " button for 1 second and you will hear a beep, indicating that the current position has been saved to memory. The "" and
"" buttons can each store a different position.
2. Recall Memory
Press the " " or "
 " button and the mount will automatically get to the position saved in the corresponding button "" or "".
希望するポジションの保存と呼び出し方法
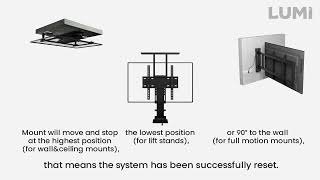
To solve some problems of motorized products, resetting the system is a common method.
Press and hold the "" button for 3~5 seconds. Mount will move and stop at the highest position (for wall&ceiling mounts), the lowest position (for lift stands), or 90° to the wall (for full motion mounts), that means the system has been successfully reset.
システムのリセット方法
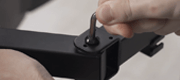
Step 1: When the mount is powered on, press the small button on the control box with a thin tool as shown (take PLB-M0544 as an example). The unit emits a beep, indicating that the control box is on standby for program coding.

Step 2: Press the " " button on the remote control, and the control box repeatedly beeps for about 10 seconds indicating that the remote control is being programmed. The process will be finished automatically until you can’t hear a beep any longer.
Note: The TV Mount can be matched with up to 20 remote controllers. To clean up the data of all the remote controllers, press and hold the code matching button for 5 seconds then release. The unit will emit two beeps confirm the successful clean up and vice versa.
リモコンとコントロールボックスのコーディング方法
Every remote controller included in the package is exclusive for the corresponding LUMI product, which means any other brand’s remote controller cannot work with LUMI’s products. Because the remote controller is independent research and development product ONLY for LUMI with a 2.4Hz radio frequency.
If your remote controller is broken, please contact your place of purchase for a replacement.
リモコンの排他的使用
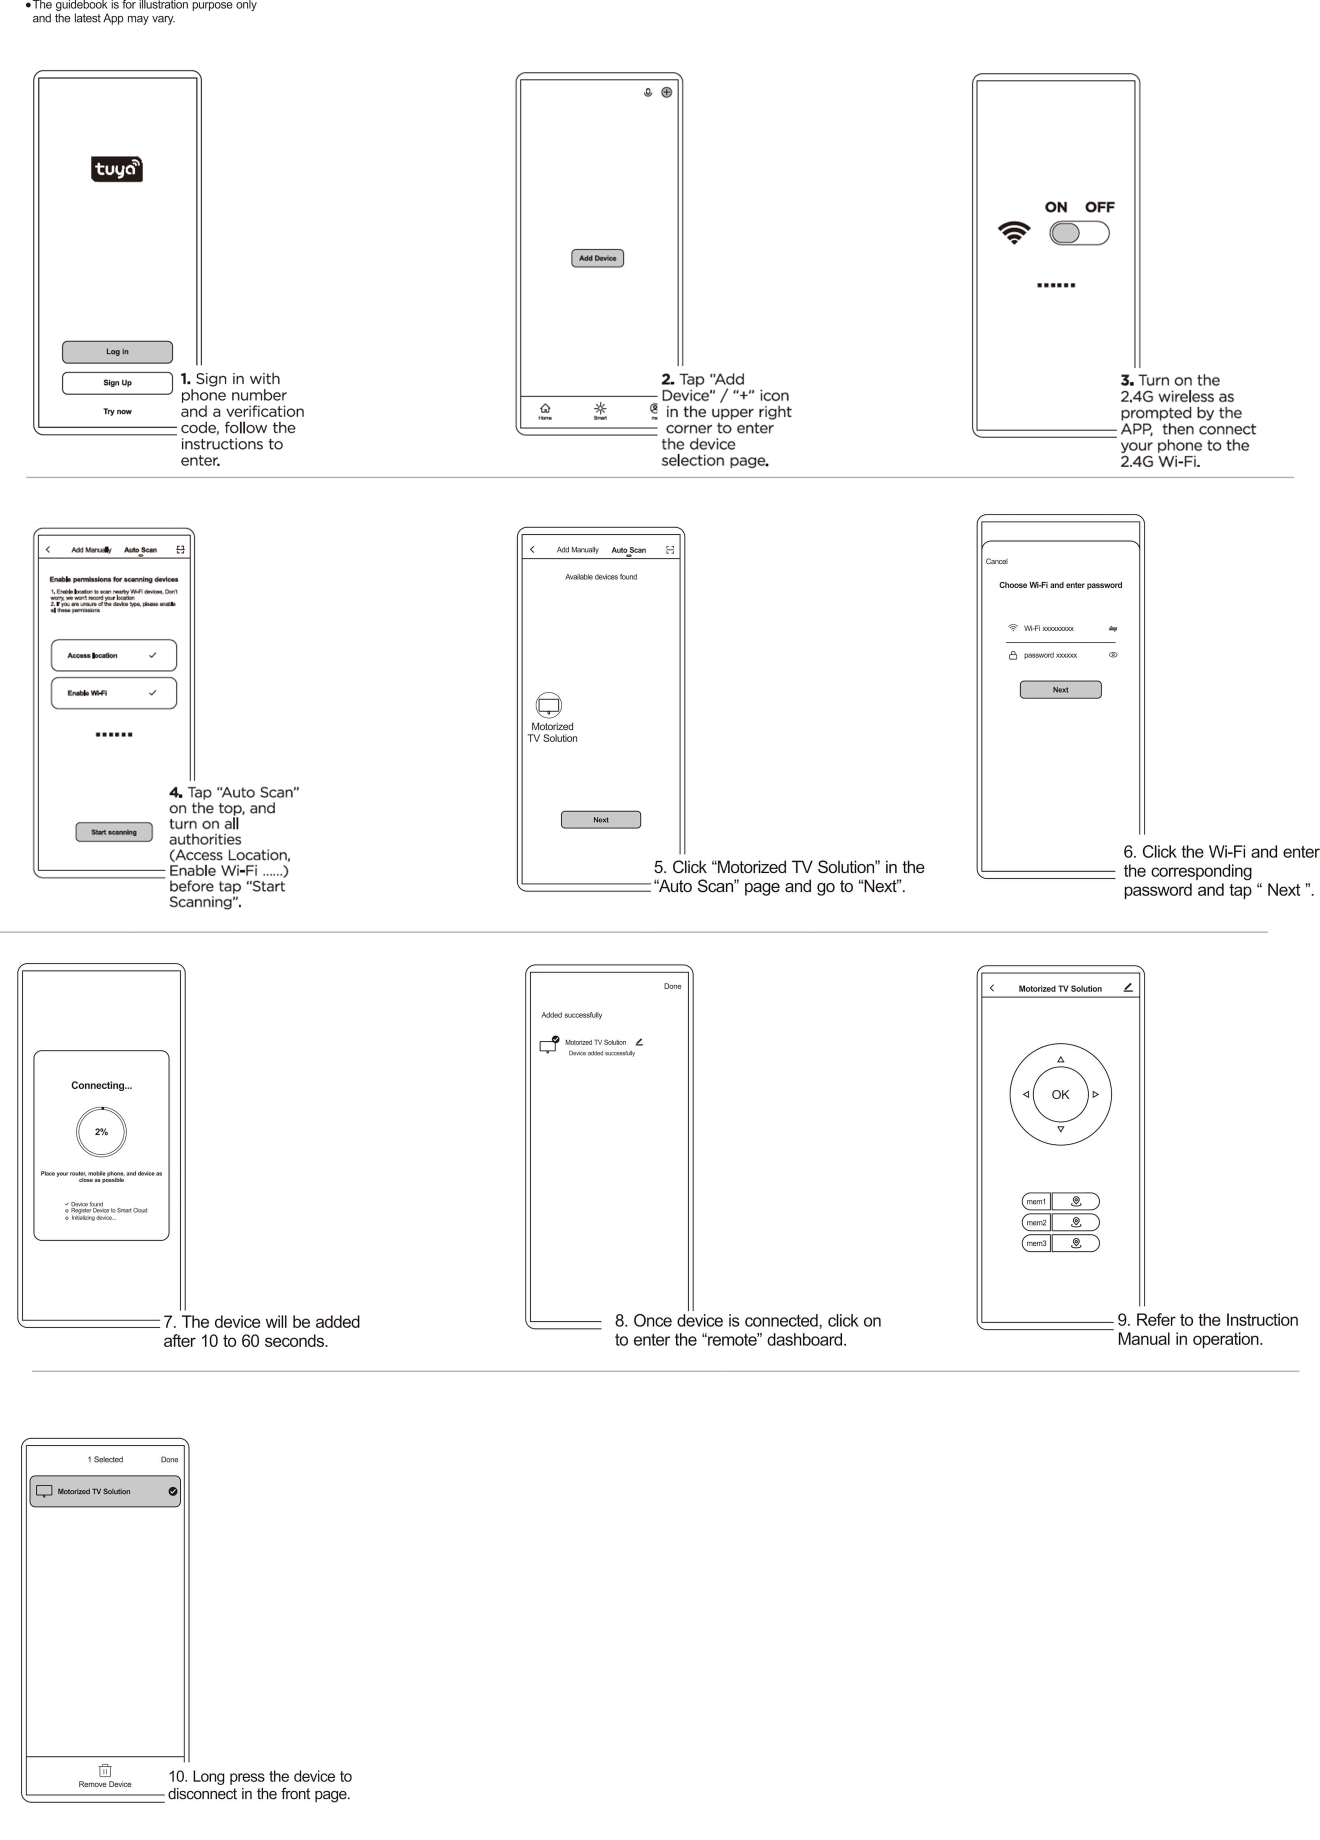
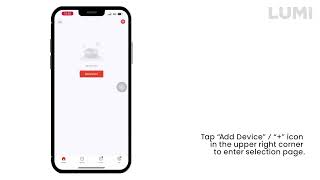
Tuyaアプリのインストールとリモートのご案内
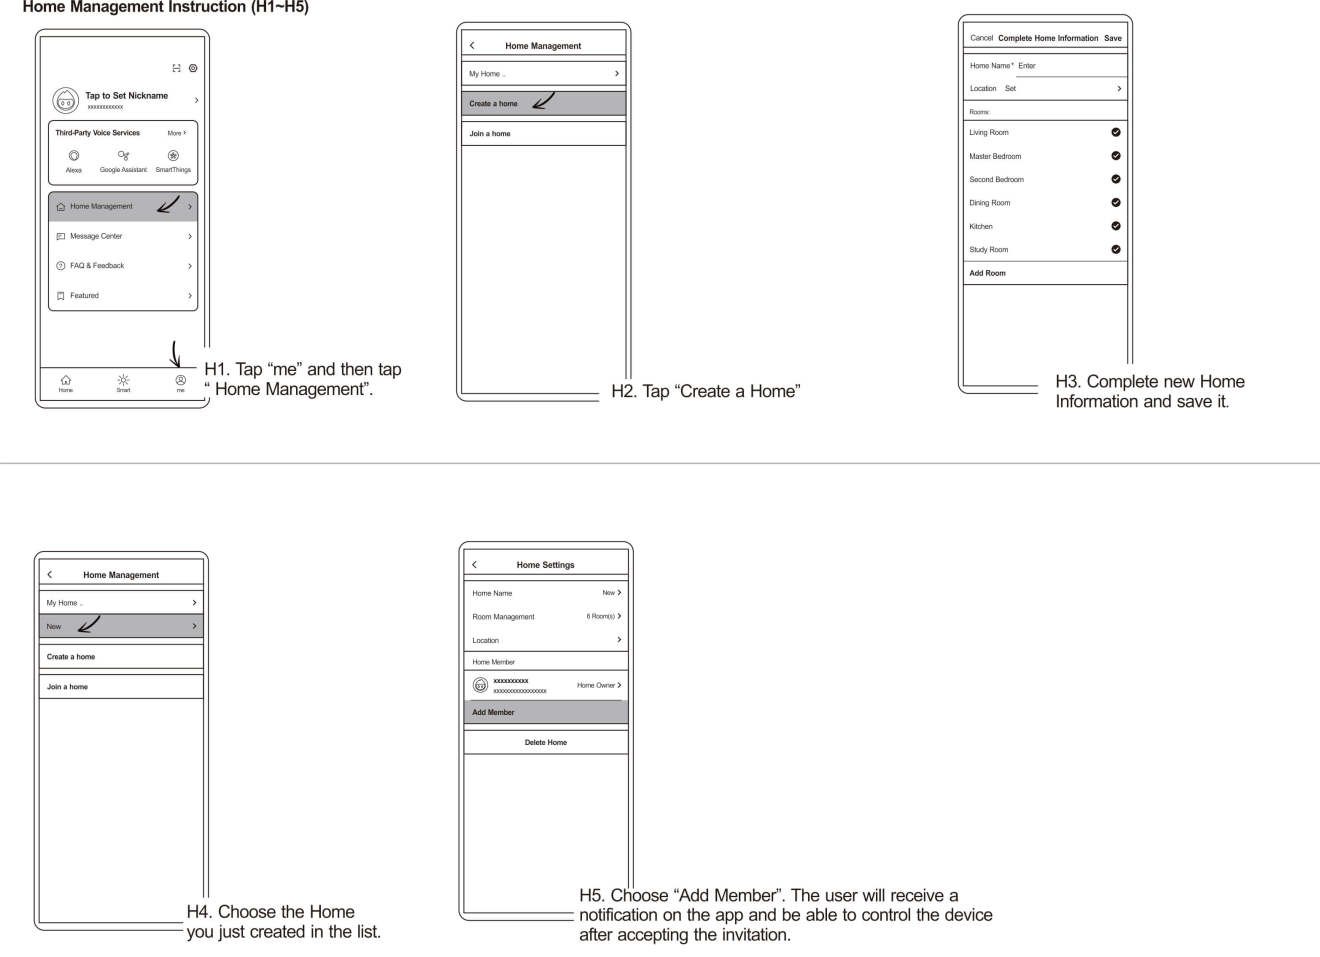
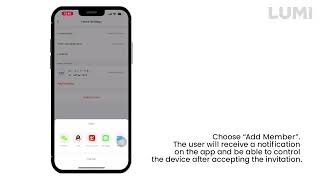
Tuya Appの家庭用管理指導
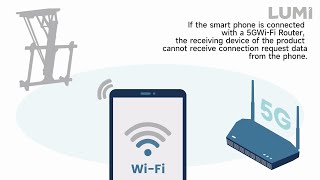
1. 5G Wi-Fi Router (the most possible reason)
If the smart phone is connected with a 5G Wi-Fi Router, the receiving device of the product cannot receive connection request data from the phone.
2. Enterprise WPA
The Wi-Fi router uses Enterprise WPA which is not supported by the receiving device of the product.
3. UPNP (Universal Plug-n-Play)
Some routers disable UPNP, so that the device cannot be searched. (Some routers disable UPNP but do not disable the multicast address and port corresponding to UPNP, so this problem will not be caused.)
4. Port Restriction
Some routers set port restrictions, that is, only common ports such as port 80 are allowed to be used, which will result in failure to search for settings and control devices.
5. AP Isolation of Public Places
Wi-Fi hotspots in public places are often set with AP isolation, which isolates all clients connected to this hotspot and cannot access each other, resulting in no device search.
6. Router Connection Limit
Some routers have a connection limit, for example, only 16 clients can be connected at most, but more than 16 terminals are actually trying to connect, which will cause the clients to keep preempting the connection and the device cannot work properly (the device can find the network but can't surf the Internet).
7. Poor Network Environment
If the network environment is very poor, or the router is too far away and the signal is too weak, it will also cause the device to fail to be added. In this case, it may be successful after several attempts.
8. Different National Standard between Wi-Fi Device and Router
The Wi-Fi device and the router do not have the same national standard, and the inconsistency of the Wi-Fi channel may cause the connection to fail.
9. Other Possible Conditions
a). The router is set to static IP address assignment.
b). The router has set MAC address restrictions, and only the specified range of MAC addresses can be connected.
c). The router is set with an internet portal, that is, after connecting to the router, a web page will pop up automatically or manually, and the user needs to enter a password to access the Internet; if the user does not enter a confirmation for a period of time, the network connection will be disconnected.
スマートフォンによるデバイスの追加に失敗する理由